借助pyautogui库,我们可以轻松地控制鼠标、键盘以及进行影像识别,实作自动抢课的功能
1.准备作业
我们在仓库里提供了2个必须的档案,包括:
- auto_get_lesson_pic_recognize.py:脚本档案
- info.xlsx:执行操作信息档案
在运行这个脚本(
auto_get_lesson_pic_recognize.py)前,你需要:
很多人学习蟒蛇,不知道从何学起,

很多人学习python,掌握了基本语法之后,不知道在哪里寻找案例上手,

很多已经做了案例的人,却不知道如何去学习更多高深的知识,

那么针对这三类人,我给大家提供一个好的学习平台,免费获取视频教程,电子书,以及课程的源代码!

QQ群:101677771

欢迎加入,一起讨论一起学习!
1.安装python并成功配置环境变量,可以在cmd下这样检查;若回传版本号,则已安装
python --version2.安装以下的依赖,windows用户请以管理员用户运行cmd并依次执行:
# pyautogui库
pip install pyautogui
# 读取excel表格的库
pip install xlrd==1.2.0
# 向计算机的剪贴板发送文本/从计算机剪贴板接收文本的库
pip install pyperclip
# 计算机视觉库
pip install opencv-python
# 影像处理库
pip install pillow
到此,成功安装了5个库
2.配合使用py脚本和xlsx档案
第一步
需要将抢课的每一步所需要点击的图示/超链接在头脑中想清楚
第二步
将抢课每一步的所需点击的图示/超链接截图,保存在和py脚本同一路径下

打开excel表格,根据第一行提示在单元格中进行输入:

- A列------备注(可填可不填)
- B列------操作型别,目前包括:
- 1.左键单击(回圈直到找到图片为止):意思就是如果没有找到你设定的那张图片,它就一直找下去,找不到就不停;你所设定的次数是找到成功的次数
- 2.输入字符串
- 3.等待
- 4.热键
- 5.左键单击(无需找到图片):找图片不管找没找到,就找那这幺多次,次数=找到成功的次数+找到失败的次数
- C列------B列的自变量
- 待点击图示名(包括图片后缀名,如.png)
- 等待的时间(秒)
- 输入的字符串
- 热键
- D列------单击重复次数
- 不填,默认为1
- 若想无限单击,填-1
按照你的选课步骤从第2行开始顺序填写excel表格的执行步骤
此时,保存excel表格
第三步
我们打开需要进行操作的选课网页
我们在cmd下切换到脚本所在目录
# 切换到D盘
D:
# 切换到xx档案夹
cd xx
python auto_get_lesson_pic_recognize.py
根据提示执行即可
上图示例

3.auto_get_lesson_pic_recognize功能介绍
(1).抢课一次
注意
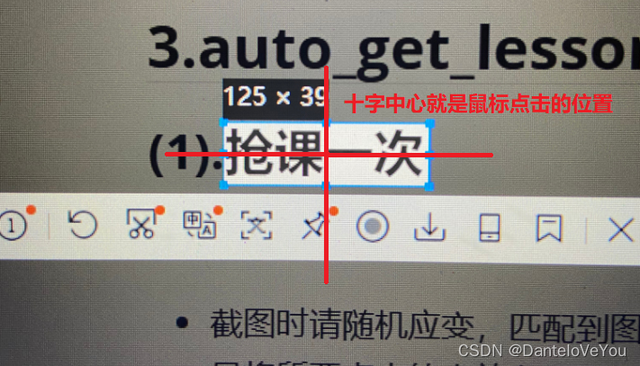
- 截图时请随机应变,匹配到影像后,鼠标自动点击影像正中央,建议配合qq截图,ctrl+a/t+a,选取一个独一无二的标记在截图中并且将所要点击的点放在qq截图四个蓝点的中央

- 如果遇到同一画面中需要点击的图示存在多个一样的,没有特征参照物,可以在那一步设定等待若干秒,手动点击图示
- 若未成功识别图片,将回圈执行识别操作;手动点击图示成功,excel表格中中的指令也会跳到下一条
- 考虑到网络延迟问题,建议合理利用等待功能
(2).蹲点捡漏
- 在抢课一次的基础上套了一层死回圈
- 巧妙利用f5、左键单击(回圈直到找到图片为止)、左键单击(无需找到图片),可以24h挂机实作蹲点捡漏
- 请发挥你的聪明才智,正确截图

4.坐标版本(不建议使用)
坐标版本位于coordinate_version目录下
如果能够确切知道所点击的位置的坐标,可以选用坐标版本
配合qq截图,你能够轻松知道你的鼠标在1920×1080分辨率下在荧屏上的坐标(以像素为单位)
顺序排列单击位置的坐标,实作抢课
excel表格中根据提示填写坐标、操作
5.代码
import pyautogui
import time
import xlrd
import pyperclip


# 定义鼠标事件
# duration类似于移动时间或移动速度,省略后则是瞬间移动到指定的位置
def Mouse(click_times, img_name, retry_times):
    if retry_times == 1:
        location = pyautogui.locateCenterOnScreen(img_name, confidence=0.9)
        if location is not None:
            pyautogui.click(location.x, location.y, clicks=click_times, duration=0.2, interval=0.2)

    elif retry_times == -1:
        while True:
            location = pyautogui.locateCenterOnScreen(img_name,confidence=0.9)
            if location is not None:
                pyautogui.click(location.x, location.y, clicks=click_times, duration=0.2, interval=0.2)
    elif retry_times > 1:
        i = 1
        while i < retry_times + 1:
            location = pyautogui.locateCenterOnScreen(img_name,confidence=0.9)
            if location is not None:
                pyautogui.click(location.x, location.y, clicks=click_times, duration=0.2, interval=0.2)
                print("重复{}第{}次".format(img_name, i))
                i = i + 1

# cell_value     1.0:左键单击
#                2.0:输入字符串
#                3.0:等待
#                4.0:热键

# 任务一:进行一轮抢课
def WorkFunction1(sheet):
    i = 1
    while i < sheet.nrows:
        # 取excel表格中第i行操作
        cmd_type = sheet.cell_value(i, 1)
        # 1:左键单击
        if cmd_type == 1.0:
            # 获取图片名称
            img_name = sheet.cell_value(i, 2)
            retry_times = 1
            if sheet.cell_type(i, 3) == 2 and sheet.cell_value(i, 3) != 0:
                retry_times = sheet.cell_value(i, 3)
            Mouse(1, img_name, retry_times)
            print("单击左键:{}  Done".format(img_name))

        # 2:输入字符串
        elif cmd_type == 2.0:
            string = sheet.cell_value(i, 2)
            pyperclip.copy(string)
            pyautogui.hotkey('ctrl','v')
            print("输入字符串:{}  Done".format(string))
        # 3:等待
        elif cmd_type == 3.0:
            wait_time = sheet.cell_value(i, 2)
            time.sleep(wait_time)
            print("等待 {} 秒  Done".format(wait_time))
        # 4:键盘热键
        elif cmd_type == 4.0:
            hotkey = sheet.cell_value(i, 2)
            # 防止重绘过快停留在原网页
            time.sleep(1)
            pyautogui.hotkey(hotkey)
            print("按下 {}  Done".format(hotkey))
            time.sleep(1)
        i = i + 1

# 任务二:蹲点等人退课
def WorkFunction2(sheet) :
    while True:
        WorkFunction1(sheet)
        time.sleep(2)


if __name__ == '__main__':
    start_time = time.time()
    file = "info.xlsx"
    # 打开档案
    xr = xlrd.open_workbook(filename=file)
    # 通过索引顺序获取表单
    sheet = xr.sheet_by_index(0)
    print("------欢迎使用自动抢课脚本------")
    print("---------@danteking---------")
    print("1.抢课一次")
    print("2.蹲点等人退课后抢指定课")
    choice = input(">>")
    start_time = time.time()

    if choice == "1":
        WorkFunction1(sheet)
    elif choice == "2":
        WorkFunction2(sheet)
    else:
        print("非法输入,退出")
    end_time = time.time()
    time_consume = end_time - start_time
    time_consume = ('%.2f' % time_consume)
    print("耗时 {} 秒".format(time_consume))


0 评论